Kafka介绍
Kafka 说明
本章,我们主要从Kafka简介、Kafka安装、Zookeeper配置、Kafka配置、配置主题、用户权限、演示、动态增加用户和常用命令这几个方面对Kafka进行介绍!
提示
本章的内容,我们是基于Kafka-3.5.1版本进行安装和配置的,因此,特别需要注意一定要按照本文说明进行安装和配置。
因为在Kafka2.8+版本以后,各种配置的方式有所改变!!!
1、🍇Kafka 简介
1.1、介绍
官网地址:https://kafka.apache.org/
官网文档:https://kafka.apache.org/documentation/
Kafka 是最初由 Linkedin 公司开发,是一个分布式、分区的、多副本的、多订阅者,基于 zookeeper 协调的分布式日志系统(也可以当做 MQ 系统),常见可以用于 Web/Nginx 日志、访问日志,消息服务等等,Linkedin 于 2010 年贡献给了 Apache 基金会并成为顶级开源项目。
1.2、使用场景
日志收集:可以用 kafka 收集各种服务的日志 ,通过已统一接口的形式开放给各种消费者;
消息系统:解耦生产和消费者,缓存消息;
用户活动追踪:kafka 可以记录 webapp 或 app 用户的各种活动,如浏览网页,点击等活动,这些活动可以发送到 kafka,然后订阅者通过订阅这些消息来做监控;
运营指标:可以用于监控各种数据。
1.3、设计目标
以时间复杂度为 O(1)的方式提供消息持久化能力,即使对 TB 级以上数据也能保证常数时间的访问性能;
高吞吐率。即使在非常廉价的商用机器上也能做到单机支持每秒 100K 条消息的传输;
支持 Kafka Server 间的消息分区,及分布式消费,同时保证每个 partition 内的消息顺序传输;
同时支持离线数据处理和实时数据处理;
支持在线水平扩展。
1.4、特点
解耦。Kafka 具备消息系统的优点,只要生产者和消费者数据两端遵循接口约束,就可以自行扩展或修改数据处理的业务过程;
高吞吐量、低延迟。即使在非常廉价的机器上,Kafka 也能做到每秒处理几十万条消息,而它的延迟最低只有几毫秒;
持久性。Kafka 可以将消息直接持久化在普通磁盘上,且磁盘读写性能优异;
Kafka 集群支持热扩展,Kaka 集群启动运行后,用户可以直接向集群添;
容错性。Kafka 会将数据备份到多台服务器节点中,即使 Kafka 集群中的某一台加新的 Kafka 服务节点宕机,也不会影响整个系统的功能;
支持多种客户端语言。Kafka 支持 Java、.NET、PHP、Python 等多种语言;
支持多生产者和多消费者。
1.5、基本概念
| 名称 | 说明 |
|---|---|
| broker | 消息中间件处理节点,一个 broker 就是一个 kafka 节点,多个 broker 构成一个 kafka 集群 |
| topic | kafka 根据消息进行分类,发布到 kafka 的每个消息都有一个对应的 topic |
| producer | 消息生产(发布)者 |
| consumer | 消息消费(订阅)者 |
| consumergroup | 消息订阅集群,一个消息可以被多个 consumergroup 消费,但是一个 consumergroup 只有一个 consumer 可以消费消息 |
2、🍈Kafka 安装
以下我们主要介绍 Kafka 在 Windows 环境中的安装过程。
2.1、下载
官网下载地址:https://kafka.apache.org/downloads
或者清华镜像:https://mirrors.tuna.tsinghua.edu.cn/apache/kafka/,建议在此镜像中去下载,因为速度快!!!
如我们下载:https://mirrors.tuna.tsinghua.edu.cn/apache/kafka/3.5.1/kafka_2.13-3.5.1.tgz
2.2、安装
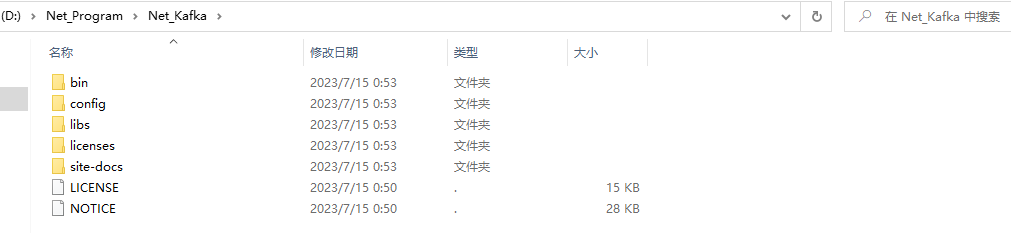
我们将下载下来的压缩文件kafka_2.13-3.5.1.tgz解压到需要安装的目录,如:D:\Net_Program\Net_Kafka,具体的解压文件如下图所示:
说明
Kafka2.8+已经内置了 Zookeeper,因此,我们可以使用内置的 Zookeeper 即可。
3、🍑Zookeeper 配置
3.1、修改 zookeeper.properties
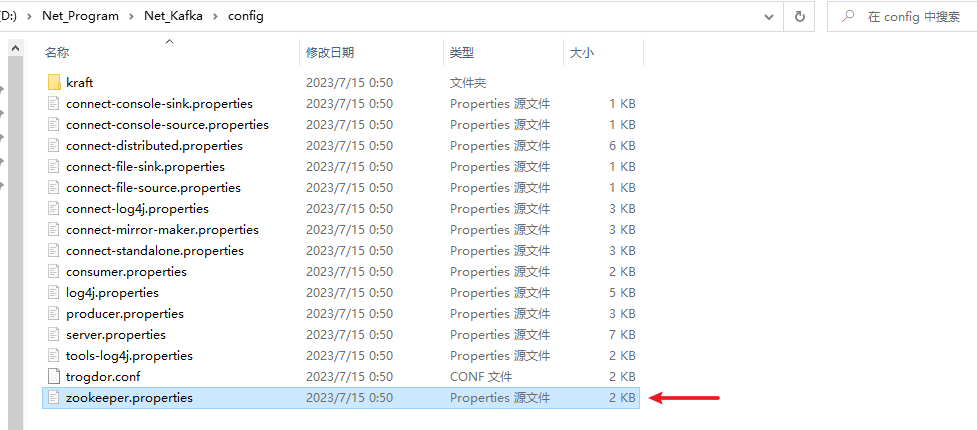
我们在 config 文件夹下找到zookeeper.properties文件,编辑该文件,修改dataDir配置和增加dataLogDir配置,dataDir用于存放数据,dataLogDir用于存放日志,具体配置如下所示:
# 数据存放目录
dataDir=D:\\Net_Program\\Net_Kafka\\data-zoo-data
# 日志存放目录,为了更好的性能,通常将日志文件挂载在单独的磁盘分区
dataLogDir=D:\\Net_Program\\Net_Kafka\\data-zoo-log
完整配置
# The number of milliseconds of each tick
tickTime=2000
# The number of ticks that the initial
# synchronization phase can take
initLimit=10
# The number of ticks that can pass between
# sending a request and getting an acknowledgement
syncLimit=5
# the directory where the snapshot is stored.
# do not use /tmp for storage, /tmp here is just
# example sakes.
# dataDir=/tmp/zookeeper
# 数据存放目录
dataDir=D:\\Net_Program\\Net_Kafka\\data-zoo-data
# 日志存放目录,为了更好的性能,通常将日志文件挂载在单独的磁盘分区
dataLogDir=D:\\Net_Program\\Net_Kafka\\data-zoo-log
# the port at which the clients will connect
clientPort=2181
# the maximum number of client connections.
# increase this if you need to handle more clients
#maxClientCnxns=60
#
# Be sure to read the maintenance section of the
# administrator guide before turning on autopurge.
#
# https://zookeeper.apache.org/doc/current/zookeeperAdmin.html#sc_maintenance
#
# The number of snapshots to retain in dataDir
#autopurge.snapRetainCount=3
# Purge task interval in hours
# Set to "0" to disable auto purge feature
#autopurge.purgeInterval=1

## Metrics Providers
#
# https://prometheus.io Metrics Exporter
#metricsProvider.className=org.apache.zookeeper.metrics.prometheus.PrometheusMetricsProvider
#metricsProvider.httpHost=0.0.0.0
#metricsProvider.httpPort=7000
#metricsProvider.exportJvmInfo=true
3.2、运行 Zookeeper
在 Kafka 的安装目录D:\Net_Program\Net_Kafka按住 Shift+鼠标右键,选择在此处打开 Powershell 窗口(S),然后执行如下命令:
.\bin\windows\zookeeper-server-start.bat .\config\zookeeper.properties
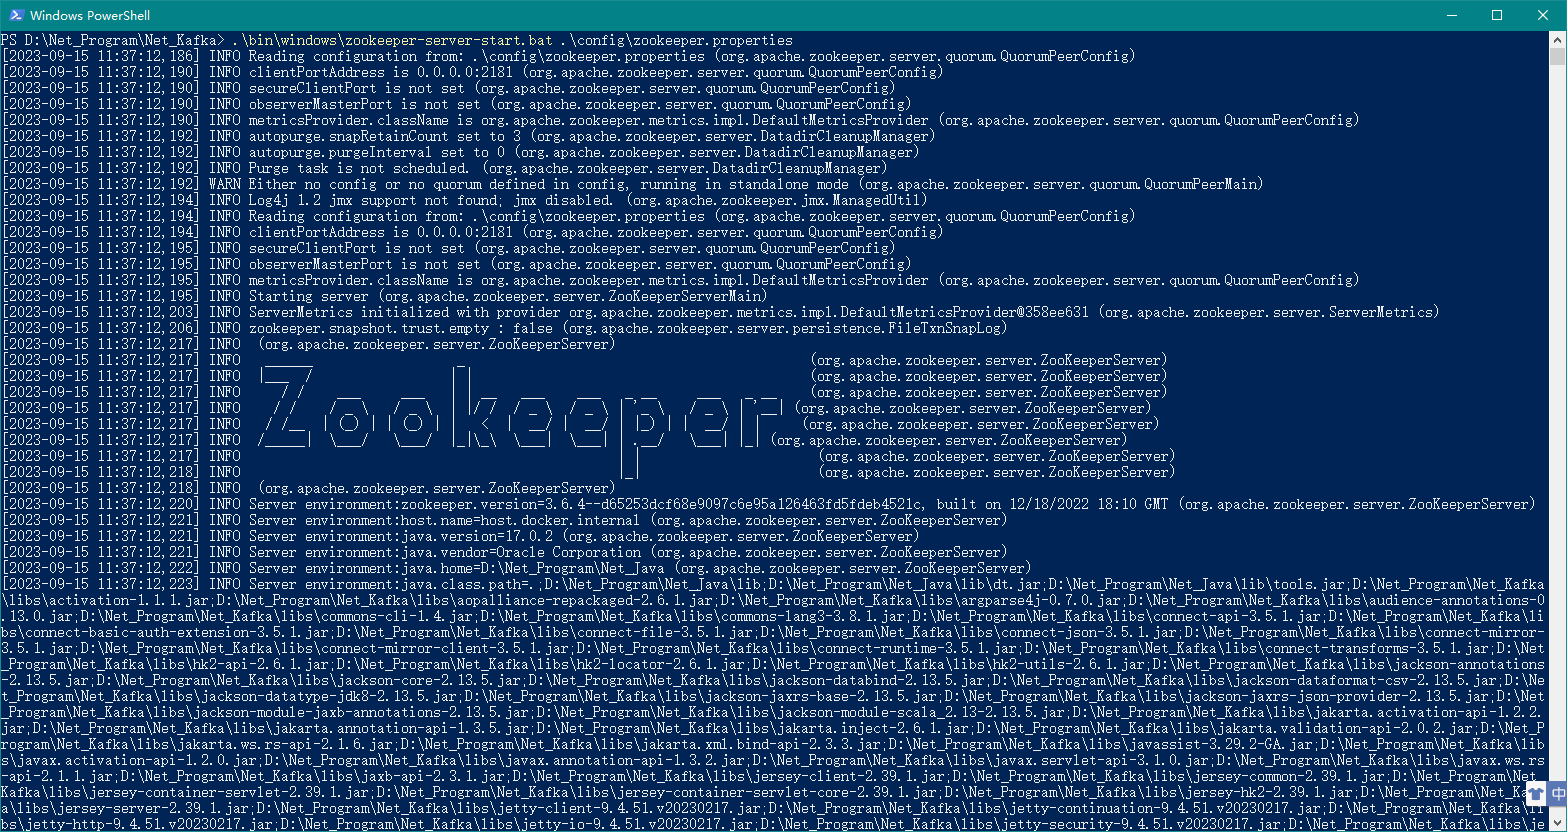
上述命令没有报错则证明 Zookeeper 运行成功!
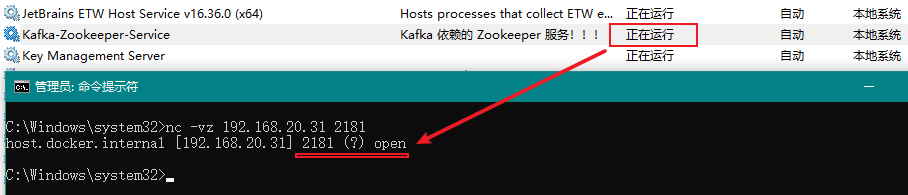
如下所示为验证 Zookeeper 的端口号2181是否为启动状态,open表示启动状态:

3.3、将 Zookeeper 作为 Windows 服务运行
此处我们使用NSSM作为服务的安装工具。
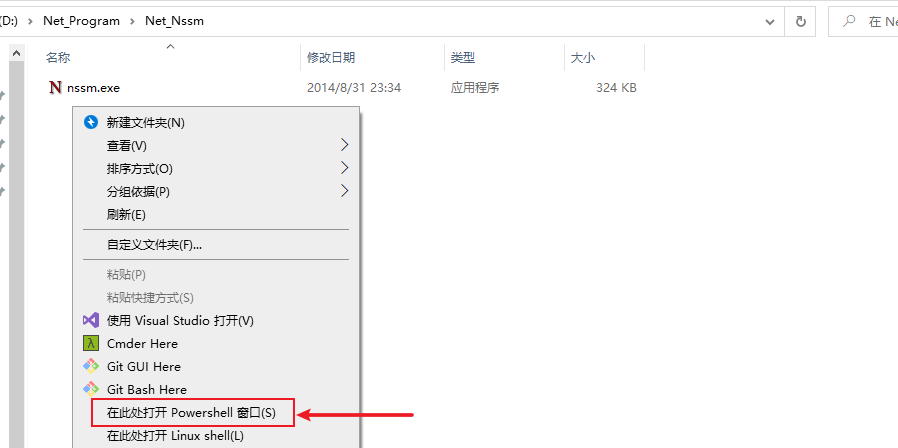
定位到NSSM工具所在的目录,并先按住Shift建,然后点击鼠标右键,选择在此处打开 Powershell 窗口(S),如下图所示:
然后我们输入如下命令调出设置窗口:
.\nssm install
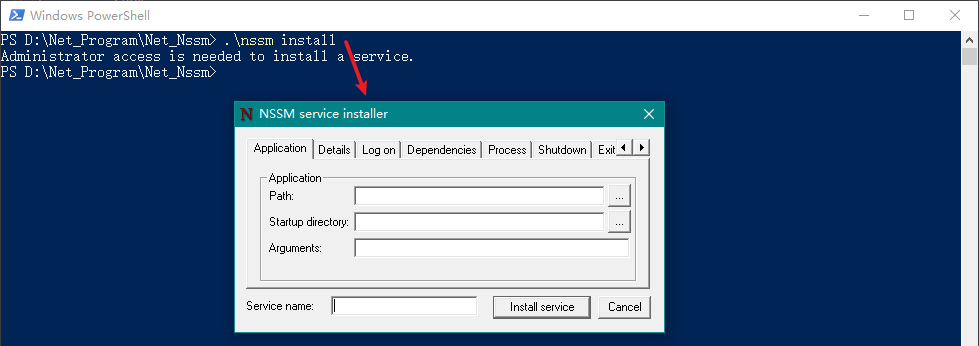
然后在弹出窗口中进行如下配置:
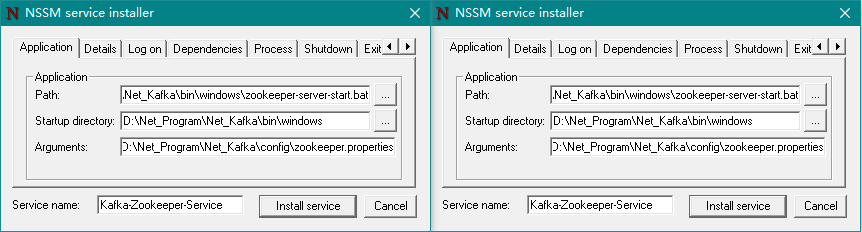
Application 选项卡(必填):
Path:选择
zookeeper-server-start.bat文件所在地址,完整地址为D:\Net_Program\Net_Kafka\bin\windows\zookeeper-server-start.bat;Startup directory:在Path选择后会自动填充(此项不用管);
Arguments:为启动服务的参数,此处填入
D:\Net_Program\Net_Kafka\config\zookeeper.propertiesService name:填写服务的名称,如:
Kafka-Zookeeper-Service;
Details(可选):
Display name:服务显示名称,如:Kafka-Zookeeper-Service;
Description:服务描述内容,如:Kafka 依赖的 Zookeeper 服务!!!。
最后我们点击Install service按钮即可。
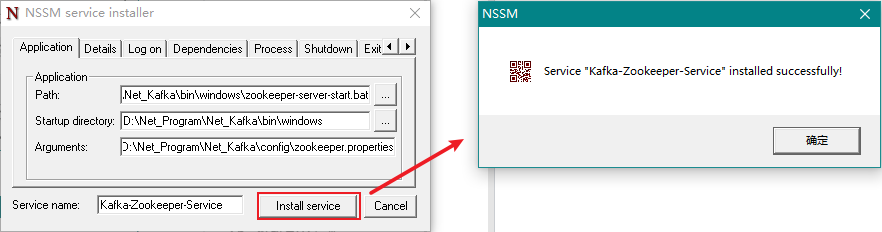

此时,我们打开 Windows 服务即可看到多了一个名称为Kafka-Zookeeper-Service的服务了。
这时候,我们可以将3.2 运行 Zookeeper中运行的 PowerShell 窗口关闭了,然后运行该服务,如下图所示:
3.4、创建 SCRAM 凭证
Kafka 中的 SCRAM 实现使用 Zookeeper 作为凭证存储。
使用 kafka-configs.bat 在 zookeeper 中创建凭证,对于启用的每个 SCRAM 机制,必须通过添加具有机制名称的配置来创建凭据。
必须在启动 Kafka 代理之前创建代理间通信的凭证,否则 kafka 服务启动会报错。
可以动态创建和更新客户端凭证,更新后的凭证将用于验证新连接。
创建用户
在 Kafka 安装目录再新开一个 PowerShell 窗口,然后分别执行如下命令:
# 创建管理员用户:admin
.\bin\windows\kafka-configs.bat --zookeeper localhost:2181 --alter --add-config 'SCRAM-SHA-256=[iterations=8192,password=123456],SCRAM-SHA-512=[password=123456]' --entity-type users --entity-name admin

# 创建读和写权限用户:quber
.\bin\windows\kafka-configs.bat --zookeeper localhost:2181 --alter --add-config 'SCRAM-SHA-256=[password=123456],SCRAM-SHA-512=[password=123456]' --entity-type users --entity-name quber

# 创建读权限用户:quber1
.\bin\windows\kafka-configs.bat --zookeeper localhost:2181 --alter --add-config 'SCRAM-SHA-256=[password=123456],SCRAM-SHA-512=[password=123456]' --entity-type users --entity-name quber1
创建3个用户 说明:
上述命令创建了 3 个用户,分别是 admin、quber、quber1;
admin:该用户主要用于超级管理员身份,后续配置会用到;
quber:该用户主要用于客户端生产和消费,同时拥有读和写的权限(此处还没设置用户的读写权限,后续会设置);
quber1:该用户主要用于客户端消费,只拥有读的权限(此处还没设置用户的读权限,后续会设置)。
查看凭证
使用如下命令可查看所有用户凭证:
.\bin\windows\kafka-configs.bat --zookeeper localhost:2181 --describe --entity-type users
查看所有用户凭证 使用如下命令可查看单个用户凭证:
.\bin\windows\kafka-configs.bat --zookeeper localhost:2181 --describe --entity-type users --entity-name admin
查看单个用户凭证 删除凭证
使用如下命令可删除某个用户凭证:
.\bin\windows\kafka-configs.bat --zookeeper localhost:2181 --alter --delete-config 'SCRAM-SHA-512' --entity-type users --entity-name quber
删除某个用户凭证
4、🍒Kafka 配置
4.1、修改 server.properties
我们在 config 文件夹下找到server.properties文件,编辑该文件,在该文件最后加入如下配置:
# SASL身份认证
# 内网IP
listeners=SASL_PLAINTEXT://192.168.20.31:9092
# 外网IP
advertised.listeners=SASL_PLAINTEXT://192.168.20.31:9092
# 使用的认证协议
security.inter.broker.protocol=SASL_PLAINTEXT
# SASL机制
sasl.enabled.mechanisms=SCRAM-SHA-256
sasl.mechanism.inter.broker.protocol=SCRAM-SHA-256
# 指定认证机制类  注意:kafka低版本使用 kafka.security.auth.SimpleAclAuthorizer,具体查阅官方文档
authorizer.class.name=kafka.security.authorizer.AclAuthorizer
# 如果没有找到ACL(访问控制列表)配置,则允许任何操作。
allow.everyone.if.no.acl.found=false
# auto.create.topics.enable=true
# delete.topic.enable=true
# 超级管理员权限用户
super.users=User:admin
提示
上述配置中,指定认证机制类请使用kafka.security.authorizer.AclAuthorizer,低版本使用kafka.security.auth.SimpleAclAuthorizer。
super.users=User:后面的admin就是之前我们创建的超级管理员。
完整配置如下所示:
server.properties 完整配置
# Licensed to the Apache Software Foundation (ASF) under one or more
# contributor license agreements.  See the NOTICE file distributed with
# this work for additional information regarding copyright ownership.
# The ASF licenses this file to You under the Apache License, Version 2.0
# (the "License"); you may not use this file except in compliance with
# the License.  You may obtain a copy of the License at
#
#    http://www.apache.org/licenses/LICENSE-2.0
#
# Unless required by applicable law or agreed to in writing, software
# distributed under the License is distributed on an "AS IS" BASIS,
# WITHOUT WARRANTIES OR CONDITIONS OF ANY KIND, either express or implied.
# See the License for the specific language governing permissions and
# limitations under the License.

#
# This configuration file is intended for use in ZK-based mode, where Apache ZooKeeper is required.
# See kafka.server.KafkaConfig for additional details and defaults
#

############################# Server Basics #############################

# The id of the broker. This must be set to a unique integer for each broker.
# broker的全局唯一编号,不能重复
broker.id=0

# 用来监听链接的端口,producer或consumer将在此端口建立连接
port=9092

############################# Socket Server Settings #############################

# The address the socket server listens on. If not configured, the host name will be equal to the value of
# java.net.InetAddress.getCanonicalHostName(), with PLAINTEXT listener name, and port 9092.
#   FORMAT:
#     listeners = listener_name://host_name:port
#   EXAMPLE:
#     listeners = PLAINTEXT://your.host.name:9092
#listeners=PLAINTEXT://:9092

# Listener name, hostname and port the broker will advertise to clients.
# If not set, it uses the value for "listeners".
#advertised.listeners=PLAINTEXT://your.host.name:9092

# Maps listener names to security protocols, the default is for them to be the same. See the config documentation for more details
#listener.security.protocol.map=PLAINTEXT:PLAINTEXT,SSL:SSL,SASL_PLAINTEXT:SASL_PLAINTEXT,SASL_SSL:SASL_SSL

# The number of threads that the server uses for receiving requests from the network and sending responses to the network
# 处理网络请求的线程数量,默认为3
num.network.threads=3

# The number of threads that the server uses for processing requests, which may include disk I/O
# 用来处理磁盘IO的线程数量,默认为8
num.io.threads=8

# The send buffer (SO_SNDBUF) used by the socket server
# 发送套接字的缓冲区大小,默认为102400
socket.send.buffer.bytes=102400

# The receive buffer (SO_RCVBUF) used by the socket server
# 接受套接字的缓冲区大小,默认为102400
socket.receive.buffer.bytes=102400

# The maximum size of a request that the socket server will accept (protection against OOM)
# 请求套接字的缓冲区大小,默认为104857600
socket.request.max.bytes=104857600


############################# Log Basics #############################

# A comma separated list of directories under which to store log files
# Kafka日志存放的路径
log.dirs=D:/Net_Program/Net_Kafka/data-kafka-log

# The default number of log partitions per topic. More partitions allow greater
# parallelism for consumption, but this will also result in more files across
# the brokers.
# topic在当前broker上的分片个数,默认为1
num.partitions=1

# The number of threads per data directory to be used for log recovery at startup and flushing at shutdown.
# This value is recommended to be increased for installations with data dirs located in RAID array.
# 用来恢复和清理data下数据的线程数量,默认为1
num.recovery.threads.per.data.dir=1

############################# Internal Topic Settings  #############################
# The replication factor for the group metadata internal topics "__consumer_offsets" and "__transaction_state"
# For anything other than development testing, a value greater than 1 is recommended to ensure availability such as 3.
offsets.topic.replication.factor=1
transaction.state.log.replication.factor=1
transaction.state.log.min.isr=1

############################# Log Flush Policy #############################

# Messages are immediately written to the filesystem but by default we only fsync() to sync
# the OS cache lazily. The following configurations control the flush of data to disk.
# There are a few important trade-offs here:
#    1. Durability: Unflushed data may be lost if you are not using replication.
#    2. Latency: Very large flush intervals may lead to latency spikes when the flush does occur as there will be a lot of data to flush.
#    3. Throughput: The flush is generally the most expensive operation, and a small flush interval may lead to excessive seeks.
# The settings below allow one to configure the flush policy to flush data after a period of time or
# every N messages (or both). This can be done globally and overridden on a per-topic basis.

# The number of messages to accept before forcing a flush of data to disk
# partion buffer中,消息的条数达到阈值,将触发flush到磁盘
#log.flush.interval.messages=10000

# The maximum amount of time a message can sit in a log before we force a flush
# 消息buffer的时间,达到阈值,将触发flush到磁盘
#log.flush.interval.ms=1000

############################# Log Retention Policy #############################

# The following configurations control the disposal of log segments. The policy can
# be set to delete segments after a period of time, or after a given size has accumulated.
# A segment will be deleted whenever *either* of these criteria are met. Deletion always happens
# from the end of the log.

# The minimum age of a log file to be eligible for deletion due to age
# 默认消息的最大持久化时间,720小时,30天,默认为168
log.retention.hours=720

# A size-based retention policy for logs. Segments are pruned from the log unless the remaining
# segments drop below log.retention.bytes. Functions independently of log.retention.hours.
#log.retention.bytes=1073741824

# The maximum size of a log segment file. When this size is reached a new log segment will be created.
#log.segment.bytes=1073741824
# 日志文件中每个segment的大小,默认为1G
log.segment.bytes=1073741824

# The interval at which log segments are checked to see if they can be deleted according
# to the retention policies
# 周期性检查文件大小的时间,默认为300000
log.retention.check.interval.ms=300000

# 日志清理是否打开,一般不用启用,启用的话可以提高性能
log.cleaner.enable=false

############################# Zookeeper #############################

# Zookeeper connection string (see zookeeper docs for details).
# This is a comma separated host:port pairs, each corresponding to a zk
# server. e.g. "127.0.0.1:3000,127.0.0.1:3001,127.0.0.1:3002".
# You can also append an optional chroot string to the urls to specify the
# root directory for all kafka znodes.
# zookeeper集群的地址,可以是多个,多个之间用逗号分割hostname1:port1,hostname2:port2,hostname3:port3
zookeeper.connect=localhost:2181

# Timeout in ms for connecting to zookeeper
# zookeeper链接超时时间,默认为18000
zookeeper.connection.timeout.ms=18000


############################# Group Coordinator Settings #############################

# The following configuration specifies the time, in milliseconds, that the GroupCoordinator will delay the initial consumer rebalance.
# The rebalance will be further delayed by the value of group.initial.rebalance.delay.ms as new members join the group, up to a maximum of max.poll.interval.ms.
# The default value for this is 3 seconds.
# We override this to 0 here as it makes for a better out-of-the-box experience for development and testing.
# However, in production environments the default value of 3 seconds is more suitable as this will help to avoid unnecessary, and potentially expensive, rebalances during application startup.
group.initial.rebalance.delay.ms=0

############################# 其他 #############################

# 消息保存的最大值20M
message.max.byte=20971520

# kafka保存消息的副本数,如果一个副本失效了,另一个还可以继续提供服务
default.replication.factor=2

# 取消息的最大直接数
replica.fetch.max.bytes=5242880

# SASL身份认证
# 内网IP
listeners=SASL_PLAINTEXT://192.168.20.31:9092
# 外网IP
advertised.listeners=SASL_PLAINTEXT://192.168.20.31:9092
# 使用的认证协议
security.inter.broker.protocol=SASL_PLAINTEXT
# SASL机制
sasl.enabled.mechanisms=SCRAM-SHA-256
sasl.mechanism.inter.broker.protocol=SCRAM-SHA-256
# 指定认证机制类  注意:kafka低版本使用 kafka.security.auth.SimpleAclAuthorizer,具体查阅官方文档
authorizer.class.name=kafka.security.authorizer.AclAuthorizer
# 如果没有找到ACL(访问控制列表)配置,则允许任何操作。
allow.everyone.if.no.acl.found=false
# auto.create.topics.enable=true
# delete.topic.enable=true
# 超级管理员权限用户
super.users=User:admin
4.2、配置 kafka_server_jaas.conf
我们在 config 文件夹下新建kafka_server_jaas.conf文件,并将如下内容填入其中:
KafkaServer {
    org.apache.kafka.common.security.scram.ScramLoginModule required
	username="admin"
	password="123456";
};
4.3、修改 kafka-server-start.bat
我们在 bin\windows 文件夹下找到kafka-server-start.bat文件,编辑该文件,在"%~dp0kafka-run-class.bat" kafka.Kafka %*的上一行增加如下配置:
set KAFKA_OPTS=-Djava.security.auth.login.config=file:%~dp0../../config/kafka_server_jaas.conf

4.4、运行 Kafka
在 Kafka 的安装目录D:\Net_Program\Net_Kafka按住 Shift+鼠标右键,选择在此处打开 Powershell 窗口(S),然后执行如下命令:
.\bin\windows\kafka-server-start.bat .\config\server.properties
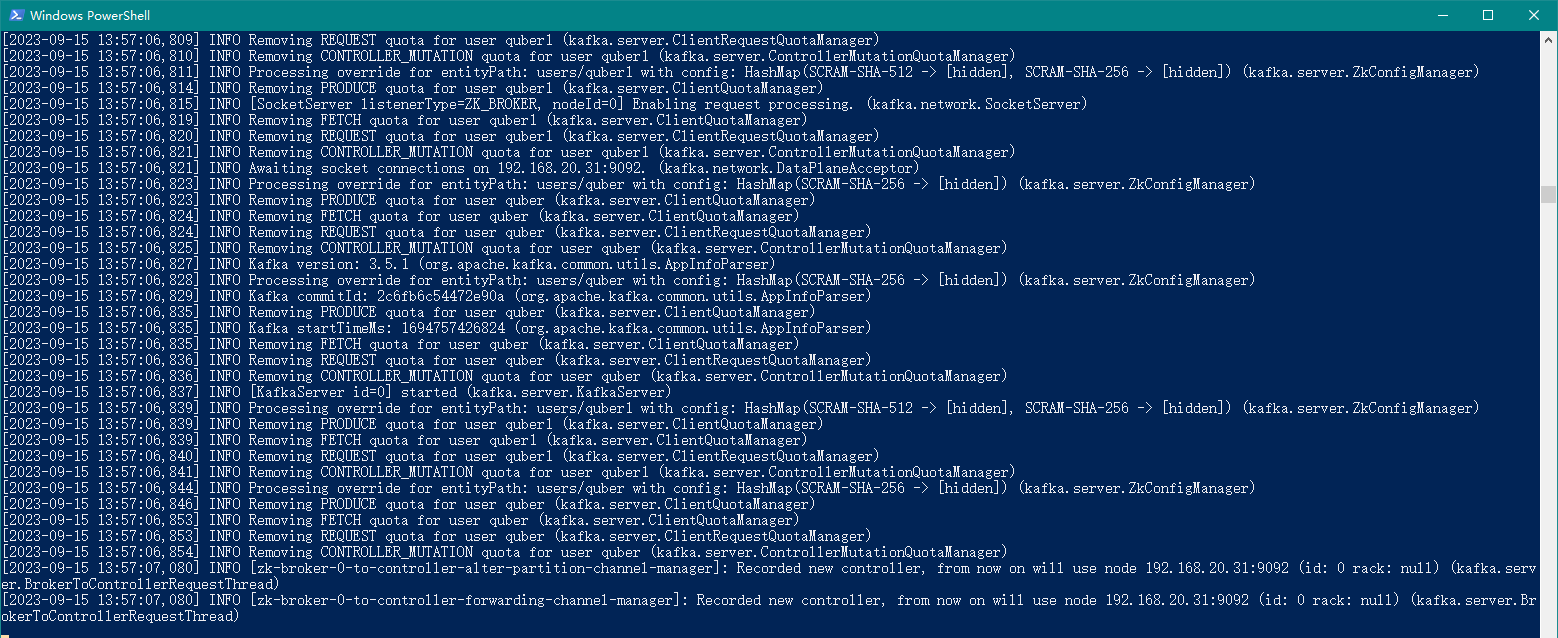
上述命令没有报错则证明 Kafka 运行成功!
如下所示为验证 Kafka 的端口号9092是否为启动状态,open表示启动状态:

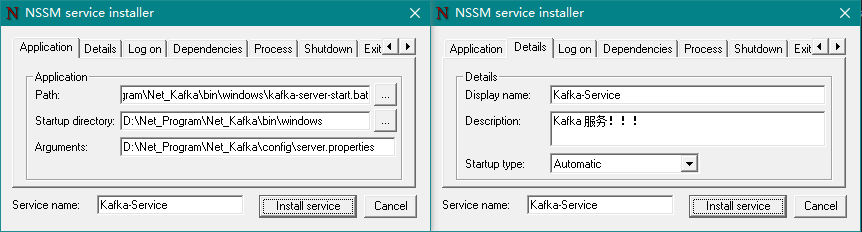
4.5、将 Kafka 作为 Windows 服务运行
此处我们使用NSSM作为服务的安装工具。
定位到 NSSM 工具所在的目录,并先按住 Shift 建,然后点击鼠标右键,选择在此处打开 Powershell 窗口(S),如下图所示:
然后我们输入如下命令调出设置窗口:
.\nssm install
然后在弹出窗口中进行如下配置:
Application 选项卡(必填):
Path:选择
kafka-server-start.bat文件所在地址,完整地址为D:\Net_Program\Net_Kafka\bin\windows\kafka-server-start.bat;Startup directory:在Path选择后会自动填充(此项不用管);
Arguments:填写
server.properties文件所在地址,完整地址为D:\Net_Program\Net_Kafka\config\server.properties;Service name:填写服务的名称,如:
Kafka-Service;
Details(可选):
Display name:服务显示名称,如:Kafka-Service;
Description:服务描述内容,如:Kafka 服务!!!。
最后我们点击Install service按钮即可。
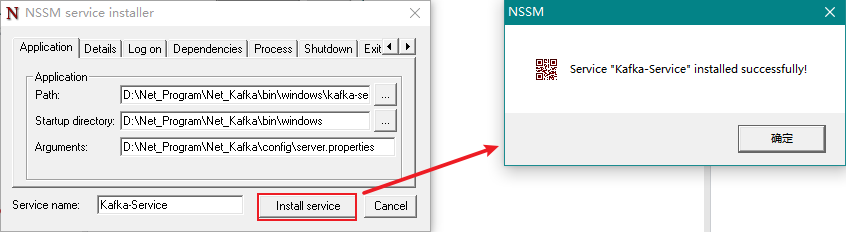

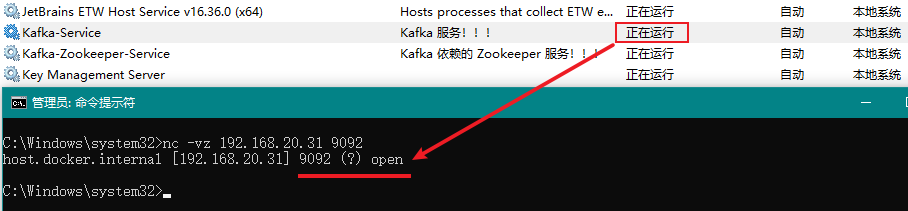
此时,我们打开 Windows 服务即可看到多了一个名称为Kafka-Service的服务了。
这时候,我们可以将4.4 运行 Kafka中运行的 PowerShell 窗口关闭了,然后运行该服务,如下图所示:
5、🍓 配置主题
5.1、配置 adminclient-configs.conf
我们在 config 文件夹下新建adminclient-configs.conf文件,,并将如下内容填入其中:
security.protocol=SASL_PLAINTEXT
sasl.mechanism=SCRAM-SHA-256
# 用户名密码配置为上述步骤创建的管理员账户
sasl.jaas.config=org.apache.kafka.common.security.scram.ScramLoginModule required username="admin" password="123456";
提示
上述配置中,admin就是之前我们创建的超级管理员。
5.2、查看所有主题
在 PowerShell 中执行如下命令可查看所有主题:
.\bin\windows\kafka-topics.bat --bootstrap-server 192.168.20.31:9092 --list --command-config .\config\adminclient-configs.conf

注意
命令中用到的 IP 地址需要和server.properties文件中listeners配置的 IP 保持一致,否则连接不上,后续其他 Kafka 命令也是如此!!!
5.3、创建主题
在 PowerShell 中执行如下命令可创建某个主题:
.\bin\windows\kafka-topics.bat --bootstrap-server 192.168.20.31:9092 --create --replication-factor 1 --partitions 3 --topic T1 --command-config .\config\adminclient-configs.conf
上述命令为创建主题T1(指定分区数为 3,副本数为 1),如下图所示:

5.4、查看某个主题
在 PowerShell 中执行如下命令可查看某个主题:
.\bin\windows\kafka-topics.bat --bootstrap-server 192.168.20.31:9092 --describe --topic T1 --command-config .\config\adminclient-configs.conf

5.5、修改某个主题
在 PowerShell 中执行如下命令可修改某个主题:
.\bin\windows\kafka-topics.bat --bootstrap-server 192.168.20.31:9092 --alter --topic T1 --partitions 4 --command-config .\config\adminclient-configs.conf
上述命令为将主题T1的指定分区数修改为 4,如下图所示:

6、🍍 用户权限
还记得在之前我们创建了 3 个用户,分别是 admin、quber、quber1 吗?
其中 admin 为超级管理员用户,quber 和 quber1 位客户端用户,其中 quber 我们需要给他设置读和写的权限,quber1 我们需要给他设置读的权限,方便后面演示。
6.1、配置用户读写权限
在 PowerShell 中执行如下命令:
# 给用户quber赋予读和写权限(主题为T1)
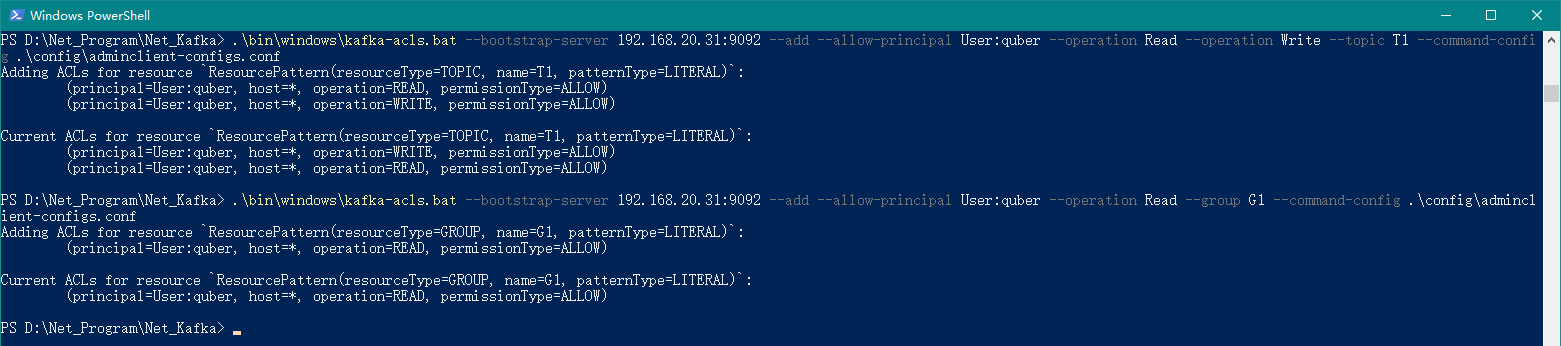
.\bin\windows\kafka-acls.bat --bootstrap-server 192.168.20.31:9092 --add --allow-principal User:quber --operation Read --operation Write --topic T1 --command-config .\config\adminclient-configs.conf
# 给用户quber赋予读权限所属的分组(分组为G1)
.\bin\windows\kafka-acls.bat --bootstrap-server 192.168.20.31:9092 --add --allow-principal User:quber --operation Read --group G1 --command-config .\config\adminclient-configs.conf
上述命令代表,给用户 quber 赋予读和写的权限,其中主题为 T1,分组为 G1,如下图所示:
6.2、配置用户读权限
在 PowerShell 中执行如下命令:
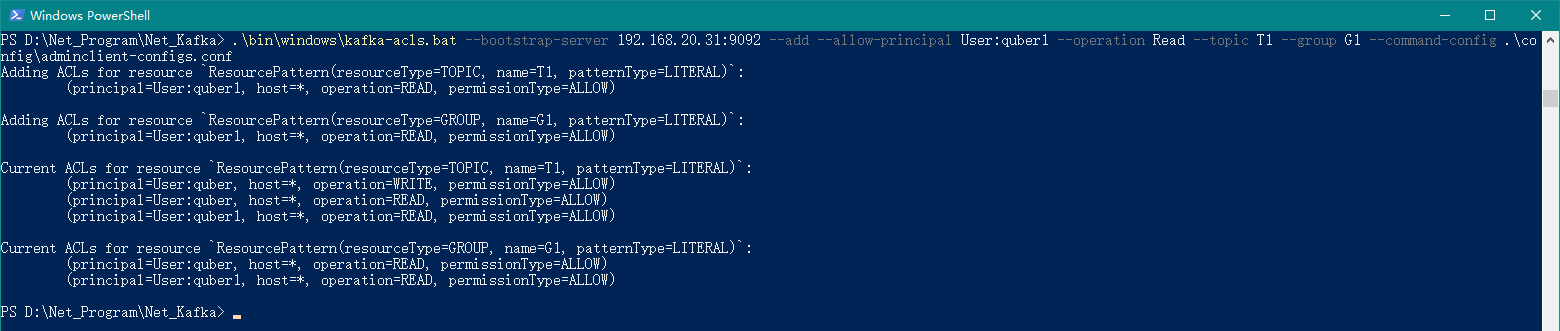
# 给用户quber1赋予读权限(主题为T1,分组为G1)
.\bin\windows\kafka-acls.bat --bootstrap-server 192.168.20.31:9092 --add --allow-principal User:quber1 --operation Read --topic T1 --group G1 --command-config .\config\adminclient-configs.conf
上述命令代表,给用户 quber1 赋予读的权限,其中主题为 T1,分组为 G1,如下图所示:
6.3、查看用户权限
在 PowerShell 中执行如下命令:
.\bin\windows\kafka-acls.bat --authorizer-properties zookeeper.connect=192.168.20.31:2181 --list
上述命令代表,获取所有用户权限,如下图所示:

从上图我们可以看到,quber 可以写和读主题 T1,quber1 只能读主题 T1,同时针对消费权限,用户 quber 和 quber1 都拥有分组 G1!
7、🌽 演示(Kafka)
以下演示我们使用的是 Kafka 安装包中自带的生产者(kafka-console-producer.bat)和消费者(kafka-console-consumer.bat)工具。
7.1、修改 producer.properties
在 config 文件夹中,我们在producer.properties文件最后加入如下内容:
security.protocol=SASL_PLAINTEXT
sasl.mechanism=SCRAM-SHA-256
sasl.jaas.config=org.apache.kafka.common.security.scram.ScramLoginModule required username="quber" password="123456";
上述配置中的username="quber",quber就是我们创建的拥有读和写权限的用户!!!
7.2、修改 consumer.properties
在 config 文件夹中,我们在consumer.properties文件最后加入如下内容:
security.protocol=SASL_PLAINTEXT
sasl.mechanism=SCRAM-SHA-256
sasl.jaas.config=org.apache.kafka.common.security.scram.ScramLoginModule required username="quber1" password="123456";
同时,我们需要将consumer.properties文件中的group.id修改为G1,因为之前我们是将quber1 用户分配给了 G1 这个分组。
consumer.properties 文件的完整配置
# Licensed to the Apache Software Foundation (ASF) under one or more
# contributor license agreements.  See the NOTICE file distributed with
# this work for additional information regarding copyright ownership.
# The ASF licenses this file to You under the Apache License, Version 2.0
# (the "License"); you may not use this file except in compliance with
# the License.  You may obtain a copy of the License at
#
#    http://www.apache.org/licenses/LICENSE-2.0
#
# Unless required by applicable law or agreed to in writing, software
# distributed under the License is distributed on an "AS IS" BASIS,
# WITHOUT WARRANTIES OR CONDITIONS OF ANY KIND, either express or implied.
# See the License for the specific language governing permissions and
# limitations under the License.
# see org.apache.kafka.clients.consumer.ConsumerConfig for more details

# list of brokers used for bootstrapping knowledge about the rest of the cluster
# format: host1:port1,host2:port2 ...
bootstrap.servers=localhost:9092

# consumer group id
group.id=G1

# What to do when there is no initial offset in Kafka or if the current
# offset does not exist any more on the server: latest, earliest, none
#auto.offset.reset=

security.protocol=SASL_PLAINTEXT
sasl.mechanism=SCRAM-SHA-256
sasl.jaas.config=org.apache.kafka.common.security.scram.ScramLoginModule required username="quber1" password="123456";
上述配置中的username="quber1",quber1就是我们创建的拥有读权限的用户!!!
7.3、启动生产者
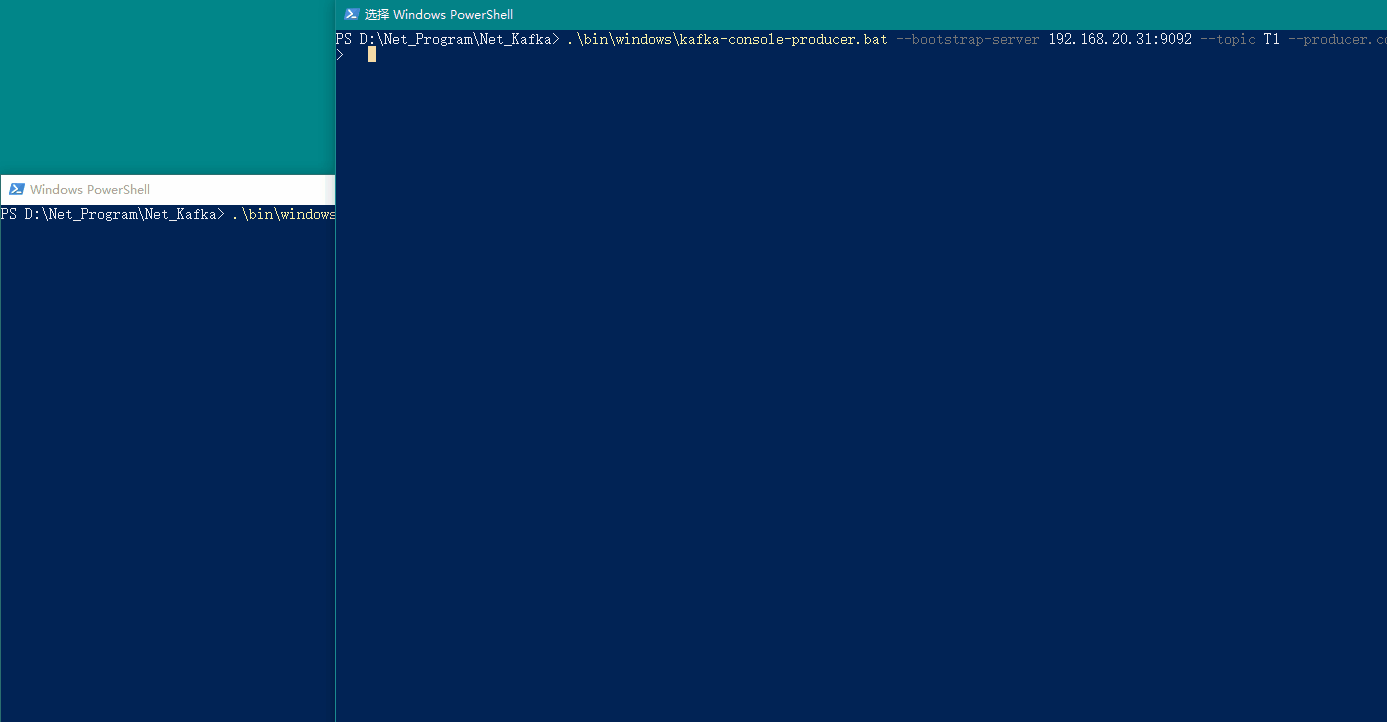
我们可以使用 Kafka 安装包中的kafka-console-producer.bat文件来作为生产者进行演示。
在 PowerShell 中执行如下命令:
.\bin\windows\kafka-console-producer.bat --bootstrap-server 192.168.20.31:9092 --topic T1 --producer.config .\config\producer.properties

7.4、启动消费者
我们可以使用 Kafka 安装包中的kafka-console-consumer.bat文件来作为消费者进行演示。
在 PowerShell 中执行如下命令:
.\bin\windows\kafka-console-consumer.bat --bootstrap-server 192.168.20.31:9092 --topic T1 --consumer.config .\config\consumer.properties

7.5、最终效果
我们在生产者窗口输入内容,即可在消费者窗口看到消费的消息,具体如下图所示:
8、🍄 演示(.Net6)
以下演示我们将使用.Net6 项目进行演示,用到的组件为Confluent.Kafka。
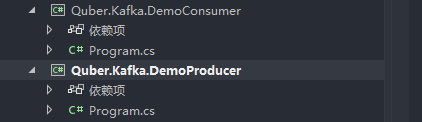
8.1、新建.Net6 生产者和消费者项目
我们分别新建基于.Net6 的生产者和消费者项目,此处我们新建控制台项目,方便演示,如下图所示我们新建好的项目:
8.2、获取 Confluent.Kafka 组件包
我们分别在这 2 个项目中安装获取Confluent.Kafka组件包。
8.3、拷贝演示代码
我们在Confluent.Kafka 组件包开源地址中,直接将生产者和消费者的代码拷贝过来。
- 生产者代码
Program.cs
// See https://aka.ms/new-console-template for more information
//Console.WriteLine("Hello, World!");

using Confluent.Kafka;

//Kafka地址和主题
string brokerList = "192.168.20.31:9092";
string topicName = "T1";

var config = new ProducerConfig
{
    BootstrapServers = brokerList,
    SaslMechanism = SaslMechanism.ScramSha256,
    SecurityProtocol = SecurityProtocol.SaslPlaintext,
    ReconnectBackoffMaxMs = 60000,
    SaslUsername = "quber",
    SaslPassword = "123456",
};

using (var producer = new ProducerBuilder<string, string>(config).Build())
{
    Console.WriteLine("\n-----------------------------------------------------------------------");
    Console.WriteLine($"Producer {producer.Name} producing on topic {topicName}.");
    Console.WriteLine("-----------------------------------------------------------------------");
    Console.WriteLine("To create a kafka message with UTF-8 encoded key and value:");
    Console.WriteLine("> key value<Enter>");
    Console.WriteLine("To create a kafka message with a null key and UTF-8 encoded value:");
    Console.WriteLine("> value<enter>");
    Console.WriteLine("Ctrl-C to quit.\n");

    var cancelled = false;
    Console.CancelKeyPress += (_, e) => {
        e.Cancel = true; // prevent the process from terminating.
        cancelled = true;
    };

    while (!cancelled)
    {
        Console.Write("> ");

        string text;
        try
        {
            text = Console.ReadLine();
        }
        catch (IOException)
        {
            // IO exception is thrown when ConsoleCancelEventArgs.Cancel == true.
            break;
        }
        if (text == null)
        {
            // Console returned null before
            // the CancelKeyPress was treated
            break;
        }

        string key = null;
        string val = text;

        // split line if both key and value specified.
        int index = text.IndexOf(" ");
        if (index != -1)
        {
            key = text.Substring(0, index);
            val = text.Substring(index + 1);
        }

        try
        {
            // Note: Awaiting the asynchronous produce request below prevents flow of execution
            // from proceeding until the acknowledgement from the broker is received (at the
            // expense of low throughput).
            var deliveryReport = await producer.ProduceAsync(
                topicName, new Message<string, string> { Key = key, Value = val });

            Console.WriteLine($"delivered to: {deliveryReport.TopicPartitionOffset}");
        }
        catch (ProduceException<string, string> e)
        {
            Console.WriteLine($"failed to deliver message: {e.Message} [{e.Error.Code}]");
        }
    }

    // Since we are producing synchronously, at this point there will be no messages
    // in-flight and no delivery reports waiting to be acknowledged, so there is no
    // need to call producer.Flush before disposing the producer.
}
- 消费者代码
Program.cs
// See https://aka.ms/new-console-template for more information
//Console.WriteLine("Hello, World!");

using Confluent.Kafka;

/// <summary>
///     In this example
///         - offsets are automatically committed.
///         - no extra thread is created for the Poll (Consume) loop.
/// </summary>
void Run_Consume( CancellationToken cancellationToken)
{
    var topics = "T1";

    var config = new ConsumerConfig
    {
        BootstrapServers = "192.168.20.31:9092",
        GroupId = "G1",
        EnableAutoCommit = false,//设置非自动偏移,业务逻辑完成后手动处理偏移,防止数据丢失
        AutoOffsetReset = AutoOffsetReset.Earliest,
        SaslMechanism = SaslMechanism.ScramSha256,
        SecurityProtocol = SecurityProtocol.SaslPlaintext,
        ReconnectBackoffMaxMs = 60000,

        //EnableAutoOffsetStore = false,
        //StatisticsIntervalMs = 5000,
        //SessionTimeoutMs = 6000,
        //EnablePartitionEof = true,
        //// A good introduction to the CooperativeSticky assignor and incremental rebalancing:
        //// https://www.confluent.io/blog/cooperative-rebalancing-in-kafka-streams-consumer-ksqldb/
        //PartitionAssignmentStrategy = PartitionAssignmentStrategy.CooperativeSticky,

        SaslUsername = "quber1",
        SaslPassword = "123456",

        //SslCaLocation = AppDomain.CurrentDomain.BaseDirectory + SslCaLocation
    };

    // Note: If a key or value deserializer is not set (as is the case below), the
    // deserializer corresponding to the appropriate type from Confluent.Kafka.Deserializers
    // will be used automatically (where available). The default deserializer for string
    // is UTF8. The default deserializer for Ignore returns null for all input data
    // (including non-null data).
    using (var consumer = new ConsumerBuilder<Ignore, string>(config)
        // Note: All handlers are called on the main .Consume thread.
        .SetErrorHandler((_, e) => Console.WriteLine($"Error: {e.Reason}"))
        .SetStatisticsHandler((_, json) => Console.WriteLine($"Statistics: {json}"))
        .SetPartitionsAssignedHandler((c, partitions) =>
        {
            // Since a cooperative assignor (CooperativeSticky) has been configured, the
            // partition assignment is incremental (adds partitions to any existing assignment).
            Console.WriteLine(
                "Partitions incrementally assigned: [" +
                string.Join(',', partitions.Select(p => p.Partition.Value)) +
                "], all: [" +
                string.Join(',', c.Assignment.Concat(partitions).Select(p => p.Partition.Value)) +
                "]");

            // Possibly manually specify start offsets by returning a list of topic/partition/offsets
            // to assign to, e.g.:
            // return partitions.Select(tp => new TopicPartitionOffset(tp, externalOffsets[tp]));
        })
        .SetPartitionsRevokedHandler((c, partitions) =>
        {
            // Since a cooperative assignor (CooperativeSticky) has been configured, the revoked
            // assignment is incremental (may remove only some partitions of the current assignment).
            var remaining = c.Assignment.Where(atp => partitions.Where(rtp => rtp.TopicPartition == atp).Count() == 0);
            Console.WriteLine(
                "Partitions incrementally revoked: [" +
                string.Join(',', partitions.Select(p => p.Partition.Value)) +
                "], remaining: [" +
                string.Join(',', remaining.Select(p => p.Partition.Value)) +
                "]");
        })
        .SetPartitionsLostHandler((c, partitions) =>
        {
            // The lost partitions handler is called when the consumer detects that it has lost ownership
            // of its assignment (fallen out of the group).
            Console.WriteLine($"Partitions were lost: [{string.Join(", ", partitions)}]");
        })
        .Build())
    {
        consumer.Subscribe(topics);

        try
        {
            while (true)
            {
                try
                {
                    var consumeResult = consumer.Consume(cancellationToken);

                    if (consumeResult.IsPartitionEOF)
                    {
                        Console.WriteLine(
                            $"Reached end of topic {consumeResult.Topic}, partition {consumeResult.Partition}, offset {consumeResult.Offset}.");

                        continue;
                    }

                    Console.WriteLine($"Received message at {consumeResult.TopicPartitionOffset}: {consumeResult.Message.Value}");
                    try
                    {
                        // Store the offset associated with consumeResult to a local cache. Stored offsets are committed to Kafka by a background thread every AutoCommitIntervalMs.
                        // The offset stored is actually the offset of the consumeResult + 1 since by convention, committed offsets specify the next message to consume.
                        // If EnableAutoOffsetStore had been set to the default value true, the .NET client would automatically store offsets immediately prior to delivering messages to the application.
                        // Explicitly storing offsets after processing gives at-least once semantics, the default behavior does not.
                        consumer.StoreOffset(consumeResult);
                    }
                    catch (KafkaException e)
                    {
                        Console.WriteLine($"Store Offset error: {e.Error.Reason}");
                    }
                }
                catch (ConsumeException e)
                {
                    Console.WriteLine($"Consume error: {e.Error.Reason}");
                }
            }
        }
        catch (OperationCanceledException)
        {
            Console.WriteLine("Closing consumer.");
            consumer.Close();
        }
    }
}


CancellationTokenSource cts = new CancellationTokenSource();
Console.CancelKeyPress += (_, e) => {
    e.Cancel = true; // prevent the process from terminating.
    cts.Cancel();
};

Run_Consume( cts.Token);
8.3、最终效果
我们在生产者窗口输入内容,即可在消费者窗口看到消费的消息,具体如下图所示:

9、🍉 动态增加用户
在3.4、创建 SCRAM 凭证中,我们提到了使用SCRAM方式来实现安全认证,因此,我们可以在不重启Kafka服务的情况下动态增加相应的用户。
如下所示命令就是相关的动态增加用户以及设置用户读写权限:
# 增加用户quber2
.\bin\windows\kafka-configs.bat --zookeeper 192.168.20.31:2181 --alter --add-config 'SCRAM-SHA-256=[password=123456],SCRAM-SHA-512=[password=123456]' --entity-type users --entity-name quber2

# 增加用户quber3
.\bin\windows\kafka-configs.bat --zookeeper 192.168.20.31:2181 --alter --add-config 'SCRAM-SHA-256=[password=123456],SCRAM-SHA-512=[password=123456]' --entity-type users --entity-name quber3

# 为用户quber2设置写权限(主题为T1)
.\bin\windows\kafka-acls.bat --bootstrap-server 192.168.20.31:9092 --add --allow-principal User:quber2 --operation Write --topic T1 --command-config .\config\adminclient-configs.conf

# 为用户quber3设置读权限(主题为T1,分组为G1)
.\bin\windows\kafka-acls.bat --bootstrap-server 192.168.20.31:9092 --add --allow-principal User:quber3 --operation Read --topic T1 --group G1 --command-config .\config\adminclient-configs.conf
Kafka 安全认证方式:
| 验证方式 | Kafka 版本 | 特点 |
|---|---|---|
| SASL/PLAIN | 0.10.0.0 | 不能动态增加用户 |
| SASL/SCRAM-SHA-256 | 0.10.2.0 | 可以动态增加用户 |
| SASL/Kerberos | 0.9.0.0 | 需要独立部署验证服务 |
| SASL/OAUTHBEARER | 2.0.0 | 需自己实现接口实现 token 的创建和验证,需要额外 Oauth 服务 |
10、🥦 常用命令
10.1、SCRAM 凭证命令
# 创建管理员用户:admin
.\bin\windows\kafka-configs.bat --zookeeper localhost:2181 --alter --add-config 'SCRAM-SHA-256=[iterations=8192,password=123456],SCRAM-SHA-512=[password=123456]' --entity-type users --entity-name admin

# 创建读和写权限用户:quber
.\bin\windows\kafka-configs.bat --zookeeper localhost:2181 --alter --add-config 'SCRAM-SHA-256=[password=123456],SCRAM-SHA-512=[password=123456]' --entity-type users --entity-name quber

# 查看所有用户凭证
.\bin\windows\kafka-configs.bat --zookeeper localhost:2181 --describe --entity-type users

# 查看单个用户凭证
.\bin\windows\kafka-configs.bat --zookeeper localhost:2181 --describe --entity-type users --entity-name admin

# 删除某个用户凭证
.\bin\windows\kafka-configs.bat --zookeeper localhost:2181 --alter --delete-config 'SCRAM-SHA-512' --entity-type users --entity-name quber
10.2、主题命令
# 查看所有主题
.\bin\windows\kafka-topics.bat --bootstrap-server 192.168.20.31:9092 --list --command-config .\config\adminclient-configs.conf

# 创建主题
.\bin\windows\kafka-topics.bat --bootstrap-server 192.168.20.31:9092 --create --replication-factor 1 --partitions 3 --topic T1 --command-config .\config\adminclient-configs.conf

# 查看某个主题
.\bin\windows\kafka-topics.bat --bootstrap-server 192.168.20.31:9092 --describe --topic T1 --command-config .\config\adminclient-configs.conf

# 修改某个主题
.\bin\windows\kafka-topics.bat --bootstrap-server 192.168.20.31:9092 --alter --topic T1 --partitions 4 --command-config .\config\adminclient-configs.conf

# 删除某个主题
.\bin\windows\kafka-topics.bat --bootstrap-server 192.168.20.31:9092 --delete --topic T2 --command-config .\config\adminclient-configs.conf
删除某个主题有问题,会导致 Kafka 服务启动不了,请谨慎操作
删除某个主题命令如下所示:
.\bin\windows\kafka-topics.bat --bootstrap-server 192.168.20.31:9092 --delete --topic T2 --command-config .\config\adminclient-configs.conf
10.3、权限命令
# 给用户quber赋予读和写权限(主题为T1)
.\bin\windows\kafka-acls.bat --bootstrap-server 192.168.20.31:9092 --add --allow-principal User:quber --operation Read --operation Write --topic T1 --command-config .\config\adminclient-configs.conf

# 给用户quber赋予读权限所属的分组(分组为G1)
.\bin\windows\kafka-acls.bat --bootstrap-server 192.168.20.31:9092 --add --allow-principal User:quber --operation Read --group G1 --command-config .\config\adminclient-configs.conf

# 给用户quber1赋予读权限(主题为T1,分组为G1)
.\bin\windows\kafka-acls.bat --bootstrap-server 192.168.20.31:9092 --add --allow-principal User:quber1 --operation Read --topic T1 --group G1 --command-config .\config\adminclient-configs.conf

# 查看用户权限
.\bin\windows\kafka-acls.bat --authorizer-properties zookeeper.connect=192.168.20.31:2181 --list
10.4、其他命令
# 查看Kafka版本
.\bin\windows\kafka-configs.bat --describe --bootstrap-server 127.0.0.1:9092 --version
11、Kafka-Manager
11.1、简介
为了简化开发者和服务工程师维护 Kafka 集群的工作,yahoo 构建了一个叫做 Kafka 管理器的基于 Web 工具,叫做Kafka Manager。
这个管理工具可以很容易地发现分布在集群中的哪些 Topic 分布不均匀,或者是分区在整个集群分布不均匀的的情况。
它支持管理多个集群、选择副本、副本重新分配以及创建 Topic。同时,这个管理工具也是一个非常好的可以快速浏览这个集群的工具,有如下功能:
管理多个 kafka 集群;
便捷的检查 kafka 集群状态(topics、brokers、备份分布情况、分区分布情况);
选择你要运行的副本;
基于当前分区状况进行;
可以选择 Topic 配置并创建 topic(0.8.1.1 和 0.8.2 的配置不同);
删除 opic(只支持 0.8.2 以上的版本并且要在 broker 配置中设置 delete.topic.enable=true);
Topic list 会指明哪些 Topic 被删除(在 0.8.2 以上版本适用);
为已存在的 Topic 增加分区;
为已存在的 Topic 更新配置;
在多个 Topic 上批量重分区;
在多个 Topic 上批量重分区(可选 partition broker 位置)。
11.2、安装
官网下载地址:https://github.com/yahoo/CMAK/releases
此处我们下载:https://github.com/yahoo/CMAK/releases/download/3.0.0.6/cmak-3.0.0.6.zip
解压安装
我们将下载下来的
cmak-3.0.0.6.zip文件解压到D:\Net_Program\Net_KafkaManager目录。配置
我们在 conf 文件夹中打开
application.conf文件,然后修改kafka-manager.zkhosts的值,如下所示:# https://github.com/yahoo/CMAK/issues/713 kafka-manager.zkhosts="192.168.3.200:2181" kafka-manager.zkhosts=${?ZK_HOSTS}
上述安装配置的各个文件已经打包好,参见:3.5.1-各个文件的配置
可以直接覆盖,但是覆盖后需要修改其中的一些配置,比如用户名称和密码、IP 地址等!!!